
You are using an out of date browser. It may not display this or other websites correctly.
You should upgrade or use an alternative browser.
You should upgrade or use an alternative browser.
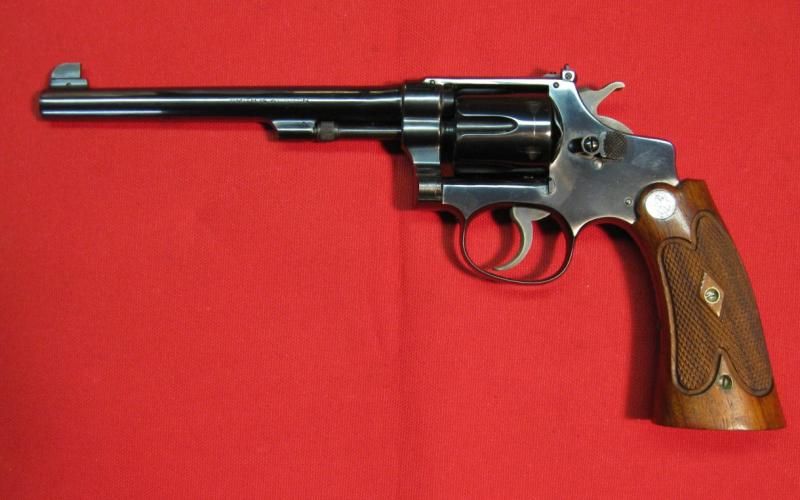
Smith and Wesson 4th Model
- Thread starter reteach
- Start date
Mike Irwin
Staff
Trick for possibly getting the grips off...
Take out the grip screw. Wrap the gun in a couple of plastic bags.
Throw it in your deep freezer for a couple of days.
That will often make the metal contract just enough to break any adhesions there may be.
Take out the grip screw. Wrap the gun in a couple of plastic bags.
Throw it in your deep freezer for a couple of days.
That will often make the metal contract just enough to break any adhesions there may be.
Mike Irwin
Staff
Hey Driftwood...
STOP MAKING ME GREEN WITH JEALOUSY!

STOP MAKING ME GREEN WITH JEALOUSY!
Throw it in your deep freezer for a couple of days.
I did that, for not quite two days. [Had to finish off a carton of ice cream to make room.] Grips are still stuck on there. Whoever made them did a great job of fitting them to the frame - not a gap anywhere.
Thanks for the idea. I'll keep working on it. Next step is to research which of the many solvents would be least likely to damage the wood but still break the seal between the wood and the metal. I used Ballistol on it when I first got it home but looks like I need something a little tougher than that.
HighValleyRanch
New member
The grips most likely fit over a positioning pin on the frame, so they cannot slide out of place. I can't imagine them being bonded to the frame in any way, and even if someone superglued wood to steel, it's not going to hold, but I really doubt there is any adhesive bond.
If it were mine to work with (and I am a grip maker), I would use a wedge at the bottom and try and see if I could start a gap between the two sides. As one side has a filler piece (that looks like it might be intergral to one side of the panels) I would slide in a knife or putty knife and see if I can get a gap going.
When I've made grips for frames that have a tang, like an LCR or GP, then the two pieces are glued together and then slip over the frame and held by tension or a screw that goes through a hole in the frame, but you would not have a positioning pin.
So if the two piecs are bonded at the bottom, then they might have to be slipped off the frame, rather than separated. But I doubt that is the case.
Looking at the photos, does the backstrap come up halfway on the back surrounding the frame? If that is the case, then it might be possible that the two halfs are bonded and I would then see if they can slip out of position.
First you need to determine if the grip is one piece bonded or two pieces.
Thanks, HVR. I appreciate your experience.
I wasn't thinking of glue - just age and the gunk that might have built up over time.
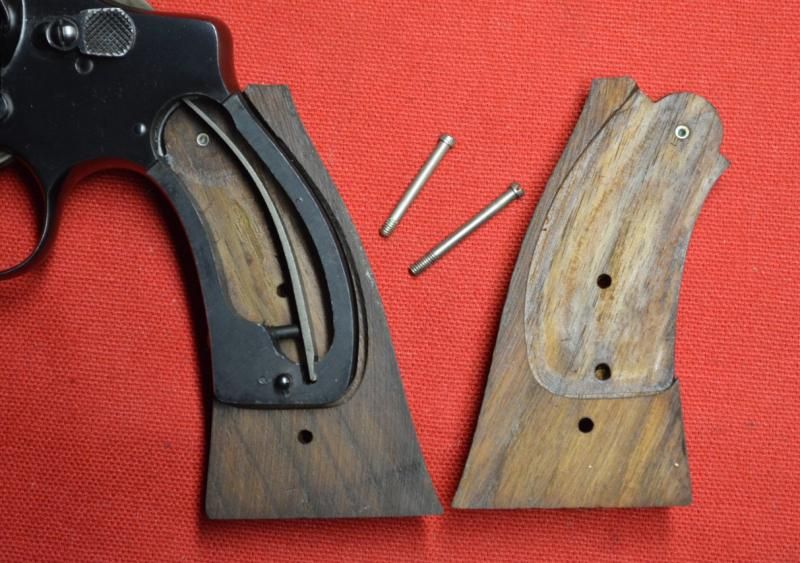
In the photo in post #12 you can see the block of wood at the bottom of the grip, intended as a spacer where the side panels extend below the metal frame. On the right side of the gun I can see two places, puttied in, where screws or dowels of some sort were added to hold the block in place. The result seems to be like a one piece grip that would have to slide off.
I wasn't thinking of glue - just age and the gunk that might have built up over time.
In the photo in post #12 you can see the block of wood at the bottom of the grip, intended as a spacer where the side panels extend below the metal frame. On the right side of the gun I can see two places, puttied in, where screws or dowels of some sort were added to hold the block in place. The result seems to be like a one piece grip that would have to slide off.
HighValleyRanch
New member
Looks like there is enough of a gap between the two sides that you could try a butter knife wedge to see if the gap increases. Doesn't look like they are bonded together because of the gap. Looks like the bottom filler is glued or attached to the right panel only.

Driftwood Johnson
New member
Howdy
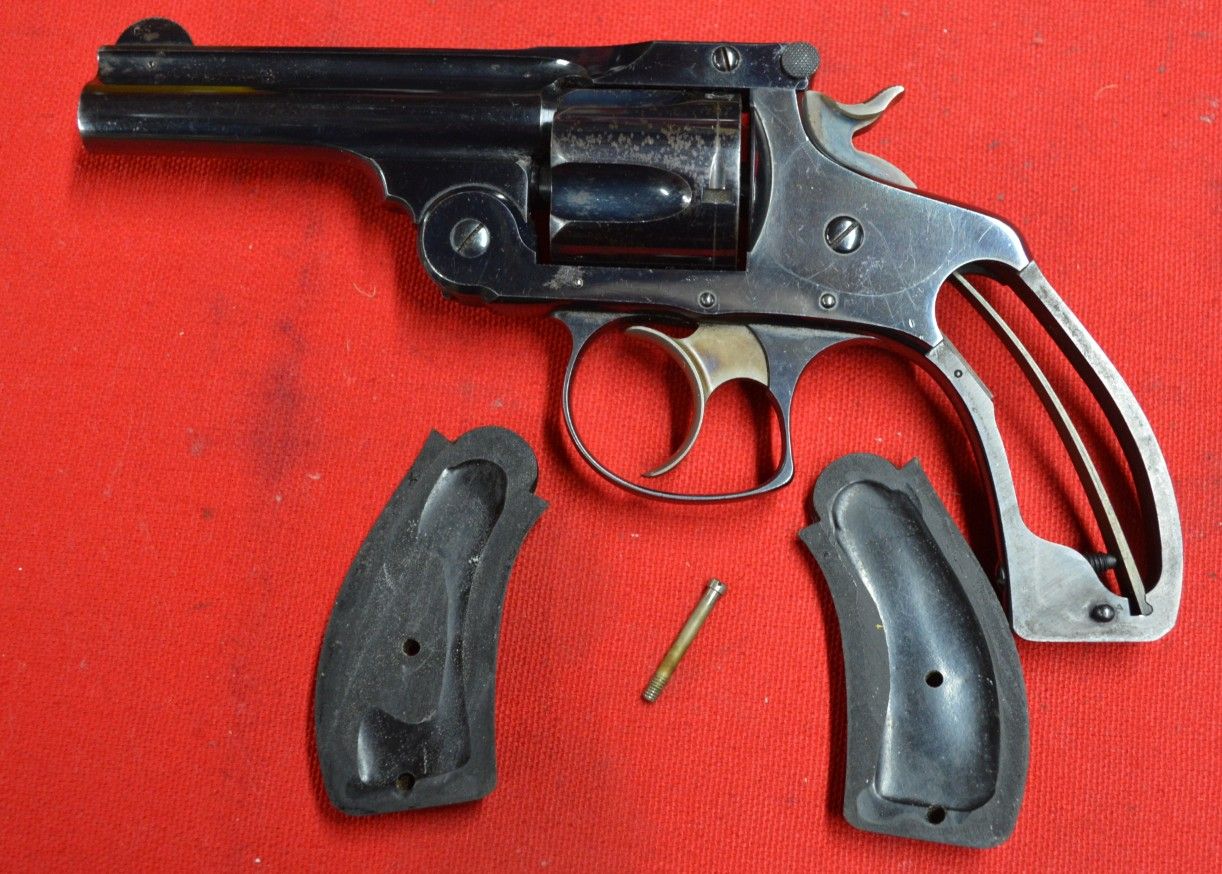
As mentioned, these revolvers had a pin near the bottom of the grip frame to position the grips. You can see the pin down near the bottom of the grip frame in this photo, and the matching holes in the grips. You can also see that the strain screw is screwed in all the way. It is tensioning the main spring exactly as it is supposed to do.
Don't reach for that kitchen knife yet. First, try this standard method of removing the grips. Unscrew the grip screw all the way, then screw it back in one turn. The screw head should be standing proud of the left grip. Gently tap the head of the screw with a light brass hammer to push the opposite grip up. If the threaded ferule in the opposite grip starts to rise up out of the grip, stop and reach for the kitchen knife. But if you can drive a grip up this way, you can reach a fingernail underneath it to pull it up. Then you can gently push the other grip off from the inside.
Here is what the mechanism under the side plate looks like. These guns had two separate sears. The claw like looking thing in front of the hammer was called the Front Sear. This is what operated the gun in double action mode.
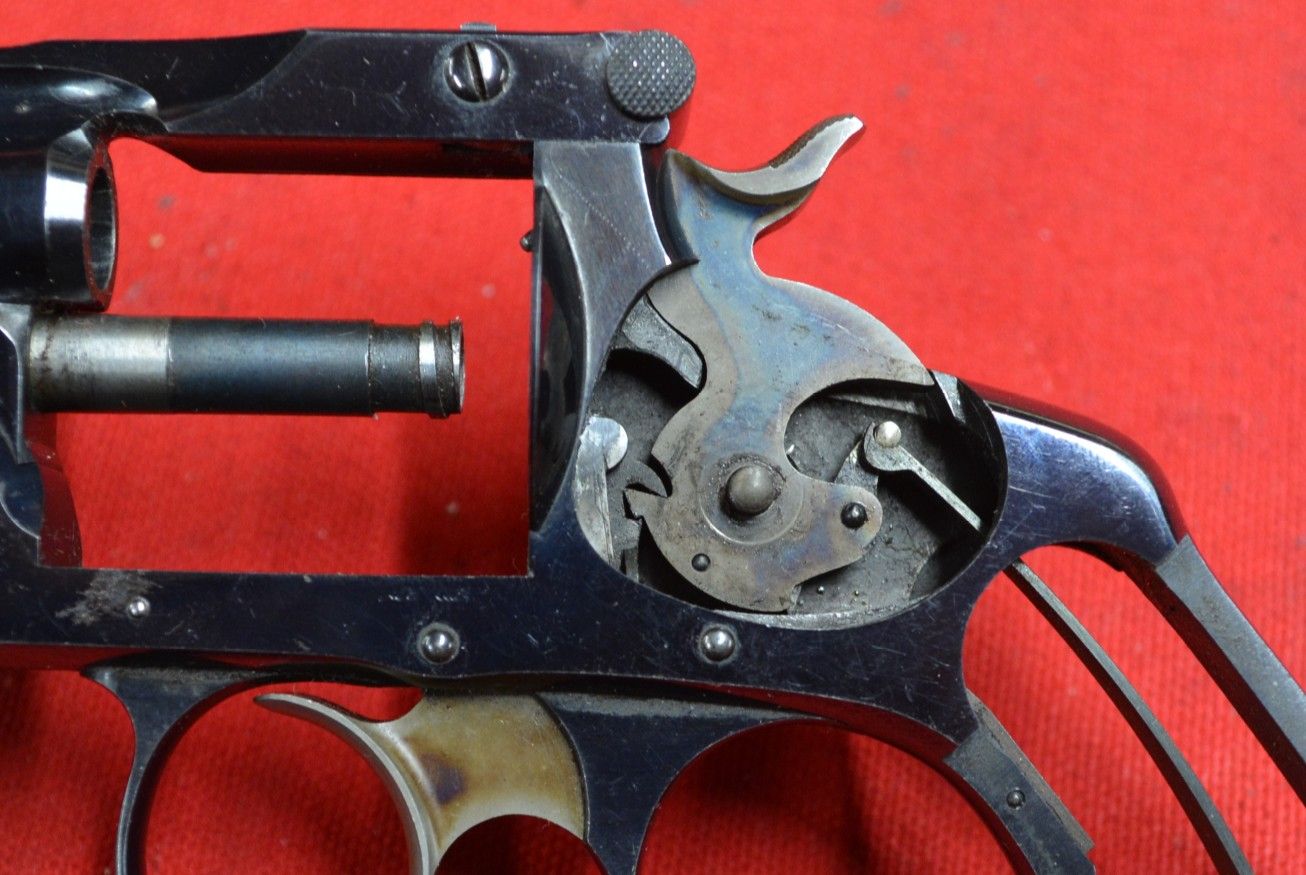
The single action sear was called the Rear Sear. In this photo, the hammer is cocked, and the rear sear is holding the hammer in the full cock position. You cannot see the rear sear because it is hidden down under the edge of the frame.
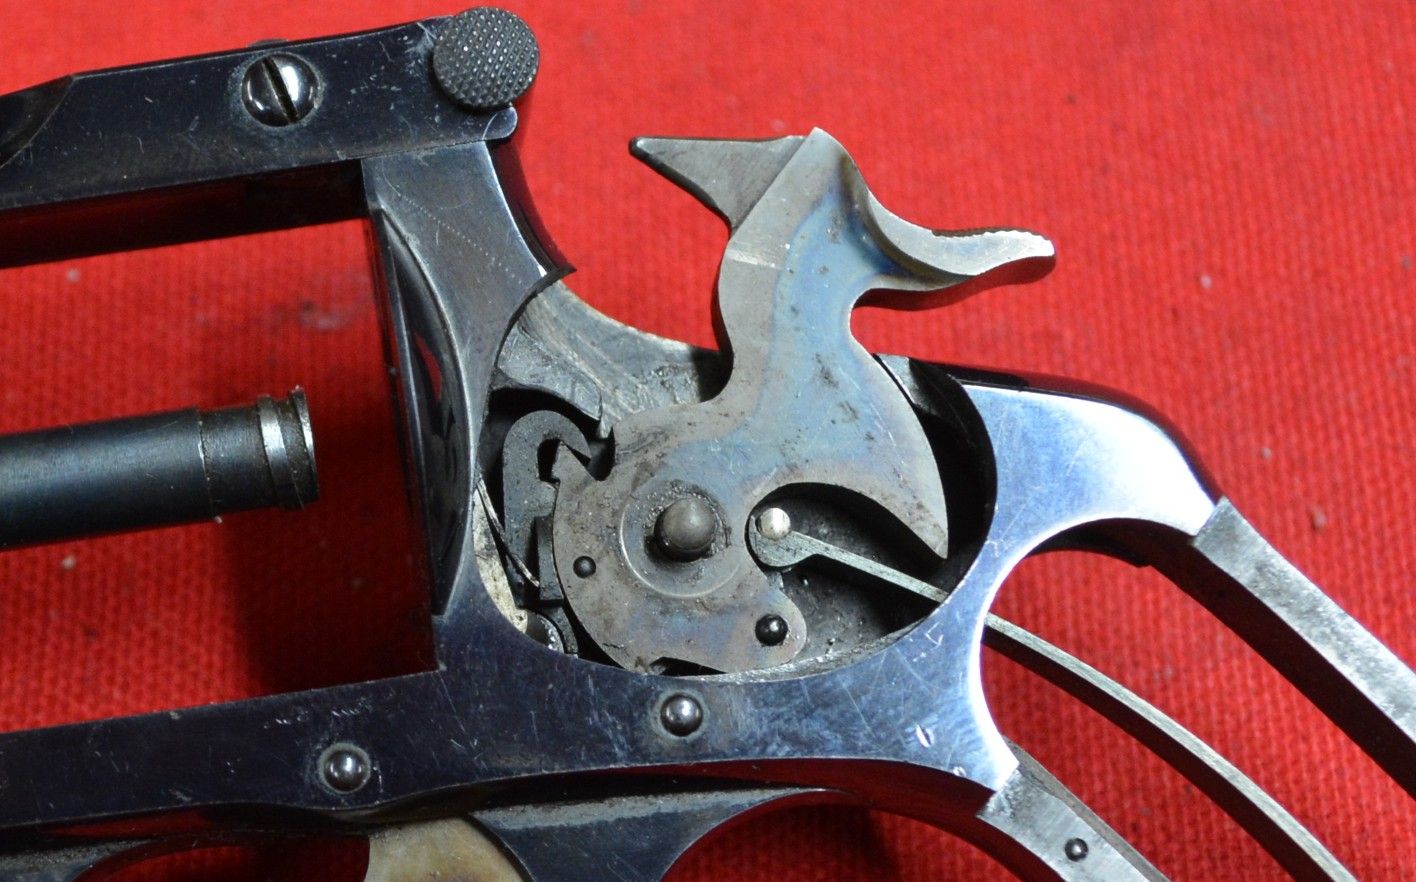
I tilted the camera down for these next two shots so you could see the Rear Sear. In this view the Rear Sear is the part below the hammer holding the hammer back slightly in the 'safety cock' position.
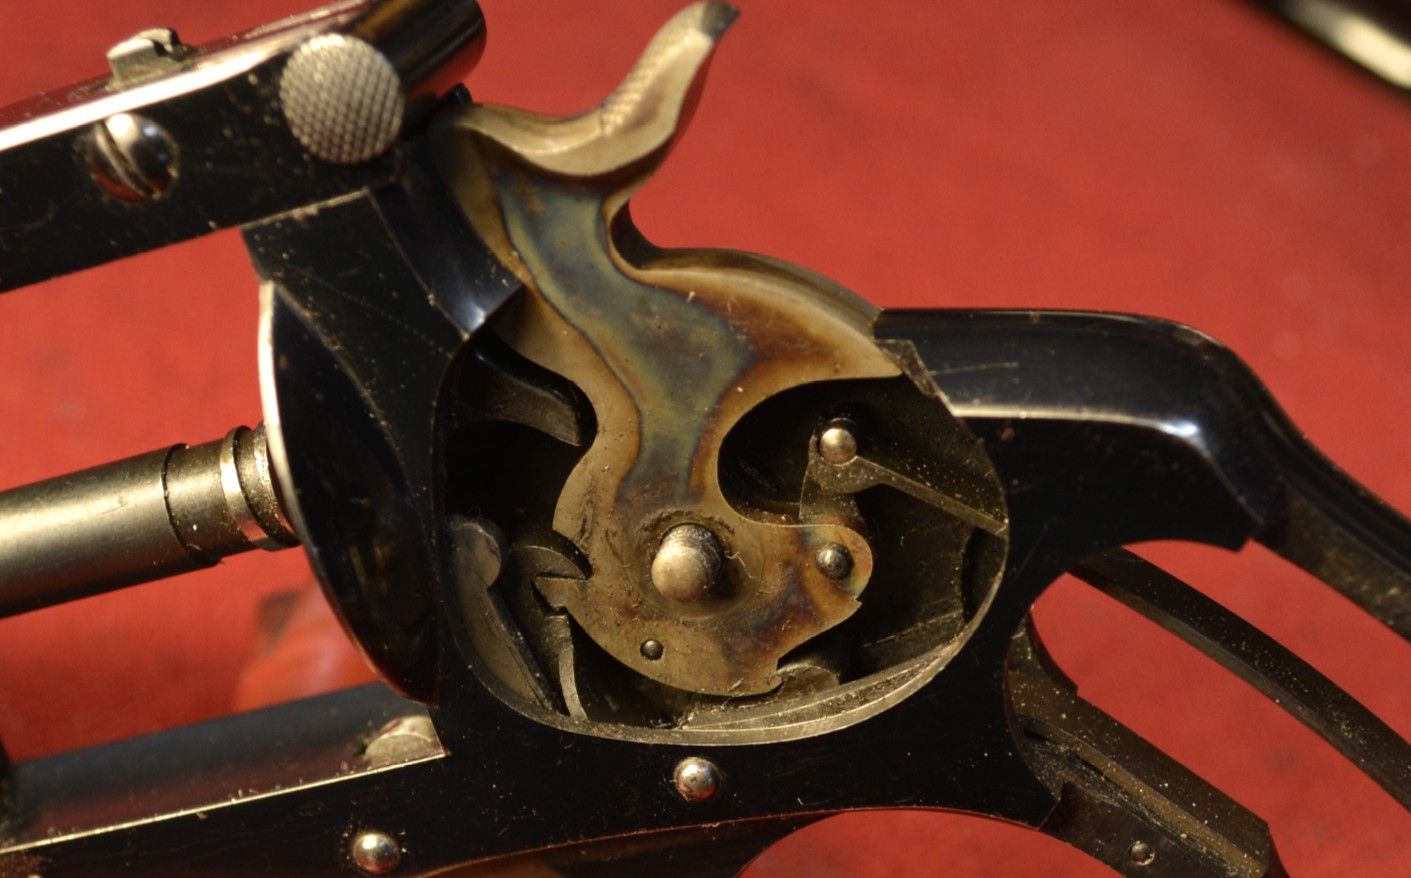
In this view the hammer is fully cocked and you can barely see the Rear Sear holding the hammer back in the full cock notch.
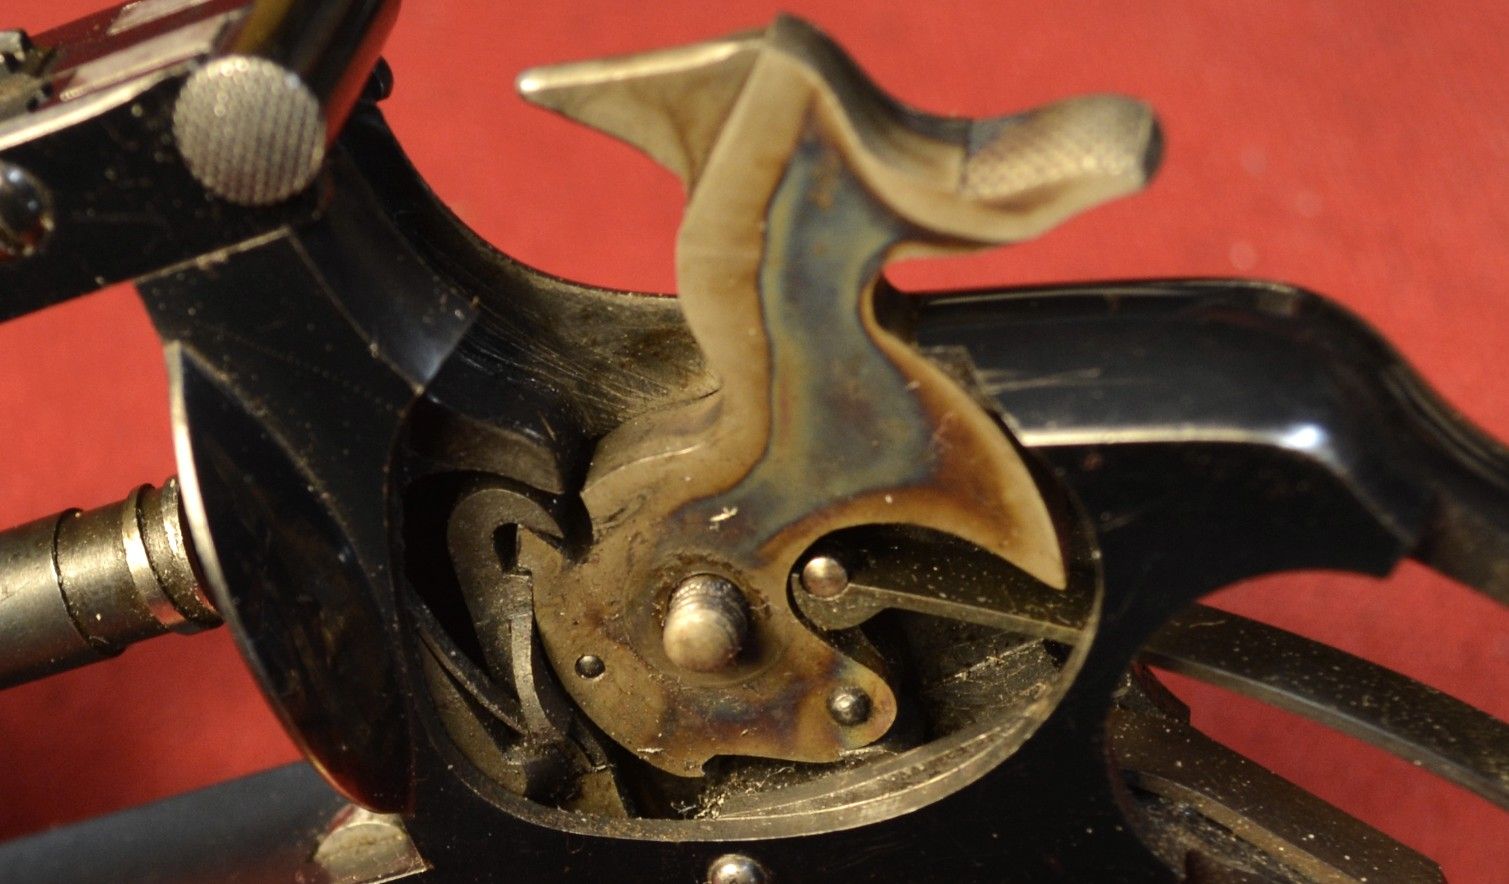
The way the action works is when you pull the trigger to fire the gun in double action mode, the Front Sear (the claw) rises to push the hammer back. At the final movement of the trigger a bit more resistance will be felt. At this point, the Front Sear pops forward, allowing the hammer to fall. When the hammer is thumb cocked for single action fire, the Front Sear goes along for the ride, and the Rear Sear pops up to hold the hammer at full cock. When the trigger is pulled, the Front Sear pops forward enough to allow the hammer to clear it, and at the same time the Rear Sear is withdrawn from the full cock notch to allow the hammer to fall.
I am trying to understand your description of what is going wrong. As I said, when the trigger is pulled double action, the Front Sear should pop forward at the end of the trigger stroke, allowing the hammer to fall. The hammer should not lockup when the trigger is pulled double action. And for single action operation, again the Front Sear has to pop forward at the same time the Rear Sear disengages from the hammer, so the hammer can fall forward.
Regarding taking one of these apart, first make sure you have some decent hollow ground screwdrivers. Do not attempt to take one apart with cheap hardware store screwdrivers. The wedge shaped blade of a cheap screwdriver will attempt to rise up out of the slot. If it rises up while you are applying torque, you will bugger up the screw slot.
Remove the large screw at the center of the side plate. This is actually a slotted nut, not a screw, but it does not matter. DO NOT attempt to pry off the side plate. You will scratch it up. The proper way to remove the tight fitting side plate on a S&W revolver is to grasp the gun loosely in your left hand, and strike the grip frame with something that will not damage it. The hickory handle of a hammer is good for this. DO NOT use the metal end, use the wooden end. Strike the grip frame just below where the frame is full width. As you strike the grip frame, the side plate should begin to rise up. Keep your thumb on the side plate so that when it pops free it does not fall onto the floor.
I have removed the side plate from dozens of Smiths this way, and I will tell you that this little guy was one of the toughest ones I have ever removed. I had to whack the frame quite a few times before the side plate started to rise.
I am going to suggest you do not go any further trying to remove any of the parts. It is tricky. You can clean and lube everything just the way it is. Get a pile of Q-tips and some rubbing alcohol. Using Q-tips soaked in alcohol, thoroughly douse every thing and rub off any old coagulated grease. Follow up with a few good blasts from a can of canned air. Be sure you have completely dried everything out. Then lightly coat everything with a light oil, such as Rem Oil. If cleaning and relubing the gun like this does not clear up the operational problems, reinstall the side plate and bring it to a gunsmith who has experience with this type of revolver.
Good luck finding one.
P.S. If I was going to fire this little guy, I would only shoot it with ammunition loaded with Black Powder. In that case, I would lube the inside with Ballistol, not Rem Oil.
P.P.S. To remove the cylinder, open the frame and lift the latch up with your thumb. Turn the cylinder counterclockwise while pulling up on it slightly. There is an interrupted thread at the rear of the cylinder arbor. Rotating the cylinder counterclockwise will engage the thread and allow the cylinder to rise off the arbor. Reverse the process to reinstall the cylinder.
As mentioned, these revolvers had a pin near the bottom of the grip frame to position the grips. You can see the pin down near the bottom of the grip frame in this photo, and the matching holes in the grips. You can also see that the strain screw is screwed in all the way. It is tensioning the main spring exactly as it is supposed to do.
Don't reach for that kitchen knife yet. First, try this standard method of removing the grips. Unscrew the grip screw all the way, then screw it back in one turn. The screw head should be standing proud of the left grip. Gently tap the head of the screw with a light brass hammer to push the opposite grip up. If the threaded ferule in the opposite grip starts to rise up out of the grip, stop and reach for the kitchen knife. But if you can drive a grip up this way, you can reach a fingernail underneath it to pull it up. Then you can gently push the other grip off from the inside.
Here is what the mechanism under the side plate looks like. These guns had two separate sears. The claw like looking thing in front of the hammer was called the Front Sear. This is what operated the gun in double action mode.
The single action sear was called the Rear Sear. In this photo, the hammer is cocked, and the rear sear is holding the hammer in the full cock position. You cannot see the rear sear because it is hidden down under the edge of the frame.
I tilted the camera down for these next two shots so you could see the Rear Sear. In this view the Rear Sear is the part below the hammer holding the hammer back slightly in the 'safety cock' position.
In this view the hammer is fully cocked and you can barely see the Rear Sear holding the hammer back in the full cock notch.
The way the action works is when you pull the trigger to fire the gun in double action mode, the Front Sear (the claw) rises to push the hammer back. At the final movement of the trigger a bit more resistance will be felt. At this point, the Front Sear pops forward, allowing the hammer to fall. When the hammer is thumb cocked for single action fire, the Front Sear goes along for the ride, and the Rear Sear pops up to hold the hammer at full cock. When the trigger is pulled, the Front Sear pops forward enough to allow the hammer to clear it, and at the same time the Rear Sear is withdrawn from the full cock notch to allow the hammer to fall.
I am trying to understand your description of what is going wrong. As I said, when the trigger is pulled double action, the Front Sear should pop forward at the end of the trigger stroke, allowing the hammer to fall. The hammer should not lockup when the trigger is pulled double action. And for single action operation, again the Front Sear has to pop forward at the same time the Rear Sear disengages from the hammer, so the hammer can fall forward.
Regarding taking one of these apart, first make sure you have some decent hollow ground screwdrivers. Do not attempt to take one apart with cheap hardware store screwdrivers. The wedge shaped blade of a cheap screwdriver will attempt to rise up out of the slot. If it rises up while you are applying torque, you will bugger up the screw slot.
Remove the large screw at the center of the side plate. This is actually a slotted nut, not a screw, but it does not matter. DO NOT attempt to pry off the side plate. You will scratch it up. The proper way to remove the tight fitting side plate on a S&W revolver is to grasp the gun loosely in your left hand, and strike the grip frame with something that will not damage it. The hickory handle of a hammer is good for this. DO NOT use the metal end, use the wooden end. Strike the grip frame just below where the frame is full width. As you strike the grip frame, the side plate should begin to rise up. Keep your thumb on the side plate so that when it pops free it does not fall onto the floor.
I have removed the side plate from dozens of Smiths this way, and I will tell you that this little guy was one of the toughest ones I have ever removed. I had to whack the frame quite a few times before the side plate started to rise.
I am going to suggest you do not go any further trying to remove any of the parts. It is tricky. You can clean and lube everything just the way it is. Get a pile of Q-tips and some rubbing alcohol. Using Q-tips soaked in alcohol, thoroughly douse every thing and rub off any old coagulated grease. Follow up with a few good blasts from a can of canned air. Be sure you have completely dried everything out. Then lightly coat everything with a light oil, such as Rem Oil. If cleaning and relubing the gun like this does not clear up the operational problems, reinstall the side plate and bring it to a gunsmith who has experience with this type of revolver.
Good luck finding one.
P.S. If I was going to fire this little guy, I would only shoot it with ammunition loaded with Black Powder. In that case, I would lube the inside with Ballistol, not Rem Oil.
P.P.S. To remove the cylinder, open the frame and lift the latch up with your thumb. Turn the cylinder counterclockwise while pulling up on it slightly. There is an interrupted thread at the rear of the cylinder arbor. Rotating the cylinder counterclockwise will engage the thread and allow the cylinder to rise off the arbor. Reverse the process to reinstall the cylinder.
Last edited:
Can't thank you enough, Driftwood, for all that info.
I had thought about using the method you describe - backing out the grip screw, then tapping it. I've done that with other guns. I'm still leery of doing that with this one because I don't know what the screw goes into on the left-side panel. The "screw" looks like any other grip screw, i.e., it's a bolt, not a pointed wood screw, so it's probably safe to tap it a little bit.
I am printing your instructions for take-down and cleaning. If I can't do it myself, I'll give your tutorial to my gunsmith.
Driftwood Johnson
New member
Threaded bolts are also known as Machine Screws. Unlike a wood screw they do not have a pointed end, and the threads are much finer than on a wood screw. Generally speaking, handgun grips are held on by a machine screw. There is usually a threaded metal ferrule pressed into one grip. The threads of the screw engage the threads of the ferrule. So by creating some slop by partially unscrewing the screw, one can often push the opposite grip out by tapping the head of the screw. Sometimes though, the threaded ferrule will come loose and may rise up out of the grip. In this case you are limited to prying the grip off with a thin blade.
Unless some idiot actually used a wood screw to screw the grips together.
Unless some idiot actually used a wood screw to screw the grips together.


I'm not getting how to post the photo in the reply as opposed to making you open the link.
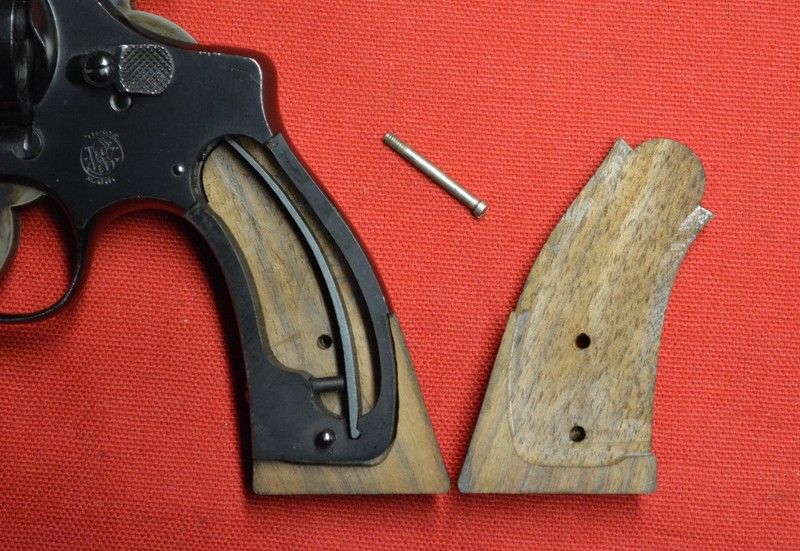
They did and they didn't. The usual grip screw is there, but two in the bottom are wood screws. CLP does a fine job of softening decades-old wood putty so you can use a utility knife blade to dig out the gunk. And that steel ruler is a good thickness for working between the frame and the grip panel.
actually used a wood screw to screw the grips together.
They did and they didn't. The usual grip screw is there, but two in the bottom are wood screws. CLP does a fine job of softening decades-old wood putty so you can use a utility knife blade to dig out the gunk. And that steel ruler is a good thickness for working between the frame and the grip panel.
HighValleyRanch
New member
You got it opened! Good job.
To post imbedded photos, simple open the attachments, then copy the URL, go back to posting and click on the image icon and paste the URL into the topic.


To post imbedded photos, simple open the attachments, then copy the URL, go back to posting and click on the image icon and paste the URL into the topic.
Driftwood Johnson
New member
Howdy Again
As Mike Irwin said, those grips are reminiscent of the extension grips that S&W put on the 32 Regulation Police and 38 Regulation Police.
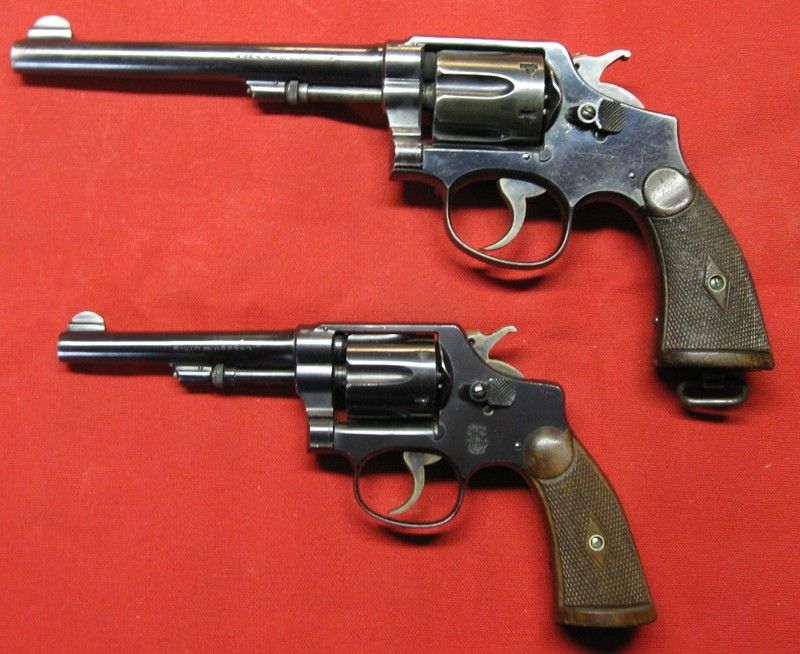
the Regulation Police had small frames, about the same size as a J frame. Here is a photo of a 32 Regulation Police under a K frame 38 Military and Police.
This is the way the extended Regulation Police grips were inletted to fit around the small round butt.
Interestingly enough, I thought all the 38 Double Action Top Breaks had hard rubber grips like mine, or ivory grips. But I just read in SCSW that some 4th and 5th Models had walnut extension grips. However, as I said before the factory would never use wood screws to fasten grips onto a S&W revolver. As you can see in this photo, the Regulation Police grips used one machine screw to hold the grips on, and a pin to help locate them.
S&W actually obtained a patent for this type of inletted grips. Because the bottom of the butt, where S&W usually put serial numbers, was covered up by the grips, the SN of the Regulation Police models was stamped on the front of the grip frame.
The 22 rimfire Bekeart target revolvers were also built on the I frame. These had extra long extension grips.
These grips were attached with two machine screws, one longer than the other, because the grips were wider at the bottom than at the top. Notice these grips too had a 'clamshell' style construction, each being inletted half as deep as the frame. I suspect with duplicating equipment, it was less labor to make up frames this way than make them from three pieces.
As Mike Irwin said, those grips are reminiscent of the extension grips that S&W put on the 32 Regulation Police and 38 Regulation Police.
the Regulation Police had small frames, about the same size as a J frame. Here is a photo of a 32 Regulation Police under a K frame 38 Military and Police.
This is the way the extended Regulation Police grips were inletted to fit around the small round butt.
Interestingly enough, I thought all the 38 Double Action Top Breaks had hard rubber grips like mine, or ivory grips. But I just read in SCSW that some 4th and 5th Models had walnut extension grips. However, as I said before the factory would never use wood screws to fasten grips onto a S&W revolver. As you can see in this photo, the Regulation Police grips used one machine screw to hold the grips on, and a pin to help locate them.
S&W actually obtained a patent for this type of inletted grips. Because the bottom of the butt, where S&W usually put serial numbers, was covered up by the grips, the SN of the Regulation Police models was stamped on the front of the grip frame.
The 22 rimfire Bekeart target revolvers were also built on the I frame. These had extra long extension grips.
These grips were attached with two machine screws, one longer than the other, because the grips were wider at the bottom than at the top. Notice these grips too had a 'clamshell' style construction, each being inletted half as deep as the frame. I suspect with duplicating equipment, it was less labor to make up frames this way than make them from three pieces.
Last edited:
That must be where the person who made my grips got the idea. They did a good job on the home made grips - the gun feels fine in the hand, with good balance and secure hold.
I have not been able to get the side plate off. The slotted nut came out pretty easily, but the plate is tight. I can see marks where someone else pried it off (or tried to). I whacked the frame with my hammer handle a bunch but it hasn't budged. I'm pretty sure I'm through trying to work on it at my kitchen table. It's going to the smith this afternoon or tomorrow.
Thanks to everyone for the information and advice.
Mike Irwin
Staff
I was looking at a very nice Bekeart this past weekend, the first one I've seen in the wild in quite a few years.
Had me really interested.
Had me really interested.
I know it's been a while, but I thought I would update this story.
I took the gun to a smith. He kept it for 5 weeks. When I picked it up he had cleaned it thoroughly and smoothed the edges of the side plate where he said the hammer had been dragging. He did not repair the single action trigger. He charged me $20, so I didn't complain too much, but he didn't fix the problem I took it in for.
I went to the range with it today. At nine feet I shot 6-8 inch 'groups.' I could probably have done better if I'd had a single action option. There was no problem with the double action function. I stopped at another smith on the way home and he didn't want to mess with it, but he gave me a recommendation for yet another guy. I have to decide whether it's worth any more money and trouble to try to bring it up to snuff.
I took a couple other guns to the range and shot much better (2" groups and at greater distance) so I think I'll continue to carry one of those.