Received my Pietta 1860 Army!!! Take a look! Pics included.

Beagle333

New member
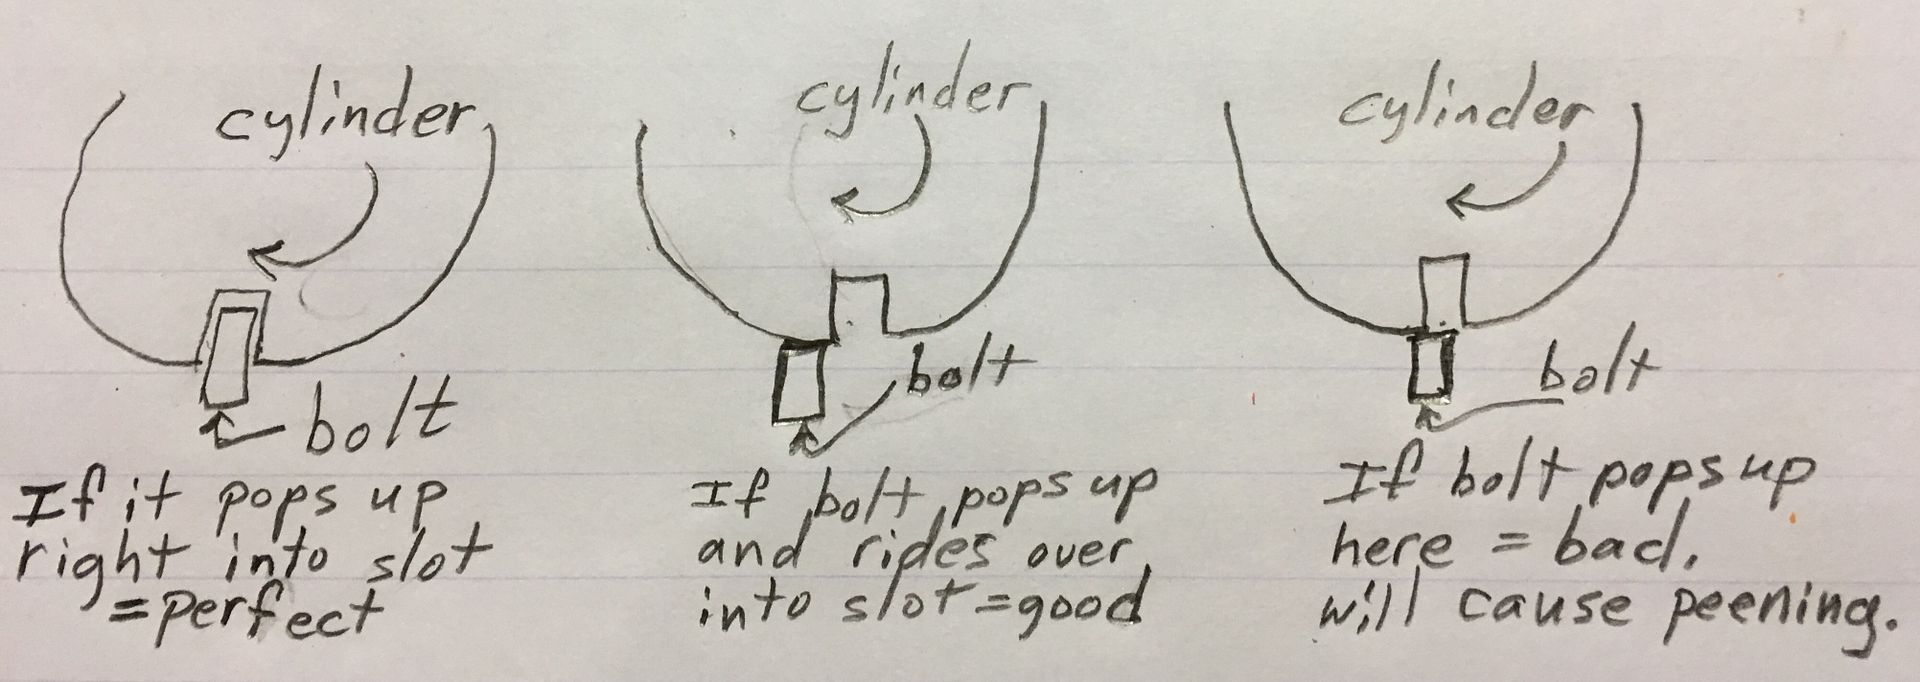
When the bolt pops up, there are only two acceptable choices. (all done with the cylinder installed on the gun) One being that the bolt pops up and the cylinder locks immediately and the bolt directly hits the slot and is perfect. This is rare and also will not be the case after the cam and bolt leg wears any at all. The other preference is that when the bolt pops up, the distance that the cylinder will still turn before lock up would equal the width of the bolt, which will mean the entire bolt surface engaged the cylinder and then slid into the slot. It's only bad if the bolt pops up and then the cylinder still has only a hair more to turn before lockup. That means the bolt is only contacting the cylinder right at the edge of the slot. I'll draw a picture and add it to this. I know it isn't easy to see, from my description.

You aren't going to do much damage by watching it slowly. It isn't going to peen the slots after only one or two or even ten hits. It's after a dozen or more times that you'd start to see it. And hopefully it's not even an issue.


You can't really "see" the bolt touching the cylinder, but you can see when it pops up and how far the cylinder will turn after that before lockup.


Okay.... here's a cutaway pic of the cylinder to show what I was so long-winded in describing. :rolleyes:
5DCA5C12-196C-43D2-BB53-A011F19BBEDA_zpsn5o9jss2.jpg
 
Last edited:

45 Dragoon

New member
When watching for bolt drop on an open top Colt type revolver, you look at the left side of the hammer slot where it meets the top of the recoil shield (as if that was where your rear sight is located). For textbook timing, the bolt should drop when the first side of the locking notch reaches that mark. At lockup, the other side of the notch should at the mark. The center drawing is correct for bolt drop. (One bolt width before the notch)

Just so you know, the bolt arm that rides the cam (the left one) should fall off the front of the cam, not slide off the side. The "sliding" situation will get worse and promotes wear. The "flag" at the very top of the arm is where the 2 surfaces are that control the bolt movement. One is the vertical (or the "trailing" edge of a flag). This is the surface that rides the cam. This also determines how far into the frame the bolt head will descend. Ideally, it can stop at the floor of the water table. That surface also needs to be perfectly flat as you don't want it to "crawl" off the side of the cam.
The top surface creates the corner that will be what falls off the cam. Go slow when removing material here (and keep the surface parallel to the bottom of the bolt ) as this determines drop.

Now you know where this event is supposed to happen (and the surfaces that make that occur). Also, keep in mind, lockup and full cock should happen at the same time and sound like one "click". Drag a finger on the cylinder when checking timing. (Of course, this involves the hand and the fitting of it.)

The procedure goes in this order:
1- the range you have is hammer at rest to full cock. The hand must deliver the chamber to battery (carry up) by that point. If the hand is short, it needs to be stretched. If battery is reached before full cock, the hand is too long and must be shortened.

2- the bolt must engage the locking notch at full cock.. When you get this done, then set the timing (bolt drop).

Mike
www.goonsgunworks.com
Follow me on Instagram @ goonsgunworks
 
Last edited:

JACKlangrishe

New member
You've gone above and beyond! I can't thank you enough! And visual aids to boot!

I'm finally starting to get the concept that the force of the bolt popping up is only a problem when it hits that edge, and that if it hits earlier it can slide into the notch. I was under the impression that the only option was it landing absolutely perfectly in the notch. EVEN after reading posts like "The bolt should drop one full bolt width before the notch." - Hawg. I guess I just had too many new concepts swimming around in the noggin.

I'll post hi res shots of my bolt and I'll try some videos of the action, along with what I'm planning on doing to adjust it before I actually start filing anything.

Picked up the 600 grit automotive sandpaper to go with the diamond needle files, and grabbed this double sided sharpening stone at harbor freight: http://www.harborfreight.com/hand-tools/sharpeners/combination-sharpening-stone-7347.html

This is probably the best intro into tinker/smithing a person can get. To the uninitiated, this is really intimidating stuff, but you guys are great at breaking it down into steps. Again, my endless thanks!

I've got lots of patience and really want to turn this into a slicked up shooter!
 
Last edited:

45 Dragoon

New member
Glad to help, didn't realize it wasn't your drawings.
Anyway, avoid the stone. Stones change shape with each pass. A true flat surface and differing grits of sandpaper and files beat a stone any day.

Mike
www.goonsgunworks.com
Follow me on Instagram @ goonsgunworks
 

JACKlangrishe

New member
The stone I picked up from Pettifogger and Duelist1954's tuning video.

tbh I'd be more comfortable with paper and files if they remove less.
Any recommendations for other grit numbers I should pick up?
 

45 Dragoon

New member
Well see, you'll be ahead of them from the get go!! Lol!! And, you're welcome!!

I say that jokingly but in all honesty, I learned from one of the best tuners that has ever been in the business. Mr. Jim Martin has been tuning S.A. revolvers since the 1950's , taught actors how to "handle" a six gun, shot competition and set up S.A.s for fast draw competition in the '50's when the "fast draw craze" took off. He learned as a young man from an elderly gentleman that actually worked at the Colt custom shop. How and what to do to make them work hard, work fast , and live to do it again tomorrow! He had to, he used them on the "circuit" as well. Shot with many famos "Shootist" including one who's name is mentioned around here now and then Mr.Bob Munden.

So, not trying to be a smart a$$ but just telling you what little I know about it. If you'll notice, an old used stone is generally worn in the middle and higher at the ends. It doesn't start out that way . . . . and the flat parts? . . . . they aren't flat.

The grits used by the factory workers are generally 220 and 320. I generally use that and 180 occasionally if I need to remove a lot of material (such as on bolt blocks). I use diamond files, reg.files (not the cheapies!! Nicholson are pretty good!).

Mike
www.goonsgunworks.com
Follow me on Instagram @ goonsgunworks
 

Beagle333

New member
I have a stone, a nice new one, but I have never used it as a stone, for the very reason that Mike mentioned. I put a piece of sandpaper (of the required grit for the job) over the stone and use it that way. You can use a piece of glass or steel too, but I find that the stone grips the back of the sandpaper and keeps it from sliding while also providing a perfectly flat surface every time. I suppose you could use a wide file too. There are many ways to get a flat surface.
That is just my way because my bench and vise sure aren't perfectly flat. [emoji41]


Sent from my iPhone using Tapatalk
 
Last edited:

foolzrushn

New member
AKexpat

I believe 1996 in that date chart should be BH, and is just a typo. Thanks, I hadn't looked for the later years. It's good to have a more recent chart.
 

JACKlangrishe

New member
Thanks 45 Dragoon!! I didn't get the impression you were being a smart ass.. I've learned lots from your posts. And the Munden name drop definitely caught my eye! =)

Well.. I think my timing is spot on!!

First Click:
XaCEeTp.png


Second Click:
0vHFjXM.png


Third and Fourth Click sound as one:
qQxlnqv.png


Here's my attempt at a video, one of several attempts, and they all went blurry as soon as I get to the first click. You'll see me stall and re-position to attempt to focus before I let the bolt drop. https://www.youtube.com/watch?v=LHPgCUrtl4M

Locks up bank vault tight on each notch with the hammer back and moderate pressure on the cylinder.


The only thing I might have made a novice mistake on is the first time I eased the hammer down.. which is something I'm not used to doing. I may have released the trigger too early and my hammer felt as if it got caught on what I'm thinking is halfcock. I froze for a second, then pulled it all the way back and I may have squeezed the trigger at the same time. Then I let go of the trigger in time to let it lock on fullcock and then eased the hammer down normally.

Was that the right way to handle that? Is it hard on the action to have let the trigger go when easing down the hammer?
 

45 Dragoon

New member
Your timing is correct (nice job!) Just make sure the bolt arm is falling off the front of the cam and not sliding off the side. If you decide to install a bolt block, the timing will change. The bolts side movement will be restricted which will make it much more accurate (mechanically) and the "slop" will be gone. The advantage of the block would be a more "solid " lock-up along with a more accurate and precise timing event.

To your question: Since the cylinder was in lock-up, nothing "bad" would happen. Easing the hammer down from full cock and stopping any where won't change anything untill you go far enough to allow the hand to slip over the next ratchet tooth. That is the first click of the two clicks you hear near the end of hammer return. At that point, you can't draw the hammer back because the hand has selected the next tooth and the bolt hasn't reset yet. At this point, you have to go the rest of the way down and allow the bolt arm slip over the cam ( reset). Then, the bolt will withdraw and the cycle can start again.

Of course, letting the hammer down from half cock does no harm in and of itself, the only negative would be turning the cyl manually would allow the bolt head to start a "beauty ring" on the cyl!. Always let the action turn the cylinder and you'll be OK. Of course holding the cylinder still at half cock to utilize the safety feature is correct.

Mike
www.goonsgunworks.com
Follow me on Instagram @ goonsgunworks
 
Last edited:

45 Dragoon

New member
I watched the video (Nice video) , and I figured the springs are still at factory tension? The mainspring can be lightened to give you a 4lb. hammer draw. The bolt only needs 3-4 lbs and will take off a lot of drag (they typically come with 8-9 lbs.!) and, this will extend the life of the cam/ bolt arm big time! These things will make handling the revolver much easier and you won't be fighting it so much. It'll also be an even much more pleasurable shooting/practicing experience.
Also, the cam height can be reduced to slightly more than bolt arm thickness. Of course the bolt itself needs some work. The left arm (cam arm) needs to be thinned (from the inside) quite a bit. Find a picture of a current Uberti bolt. They are excellent!! The junction of that arm with the body of the bolt needs to be rounded to spread the tension which will prolong life as well. The arm should flex easily. This will also reduce the wear to the left side of the hammer.

Mike
www.goonsgunworks.com
Follow me on Instagram @ goonsgunworks
 
Last edited:

Hoppy

New member
This is such a great topic. Thanks for all of the information back and forth. It's going to be so handy as I received an 1851 Navy Pietta for Christmas. The Cabela's navy yank.

I have everything but the caps. Once I have those I'll head to the range to try it out.
 

JACKlangrishe

New member
Great pick on that 51 Yank! I was on the fence between the 60 and the 51 Yank for a while and realized the only option is to get them all.. one at a time of course.

Post lots of pics and videos and make me jealous!! :D
 

JACKlangrishe

New member
Thanks 45!! I definitely want to swap out for a lighter spring and just started researching that. I'll also post some nice shots of my bolt and compare it to the Uberti bolt. Amazingly, I totally understood your post which is making me even more confident that these concepts are finally clicking.

..but.. before I get to that part I need to strip this gun.. so I attempted to do that last night, which I assumed would be a relatively painless process.. that is, until I went toe to toe with the workings of the infamous Pietta Gorilla... THE WEDGE! I never, never, Never assumed it was in this tight.. even after reading post after post about people going as extreme as attempting to press it out with a vise.

I've gone through more than a dozen clothespins, all of them morph on the first blow with the rubber mallet, then crack in the middle after 5 or 6 more blows. I first started doing it with the gun in my hand to avoid impact on the frame and internals while holding the half-a-clothespin in place with my fingers and whacking it with the mallet in my other hand. After about 15 attempts I was concerned I might start loosing accuracy and whack the cylinder by accident so I took a break. Still cant believe I'm taking a mallet to a firearm.

I soaked it in oil. I removed the retaining screw, even though I know it's a blind hole. I figured there was no downside to removing it and a slight chance it's putting pressure on the wedge. No luck.

Then after some reading I propped up the barrel with some wood wrapped in cloth and kept it stable on a table while I hammered away and snapped some more clothespins. Done with those.

No old house keys lying around, unfortunately. Just the keys on my keychain and I'm pretty sure they'll deform based on what I'm reading online. I'll try to see if I have any really really old pennies, but probably not. The guys at Pietta are crazy putting all that work into a gun and shipping it in a condition that you have to whack at it with a mallet to strip it. I remember thinking this cant be good for the firearm with each blow.

Now I'm considering ordering that drift punch from Track but I'd really like to get this thing out today. This part isn't fun.
 
Last edited:

Hoppy

New member
Jack,
Here's a picture of my new revolver. I hope the picture isn't too hard to see. I have a vaquero and it's such a great gun, love single actions. Can't wait to shoot this. I downloaded the two parts of the tuning guide. Mine seems very smooth. There is a slight scrape when I cock the hammer back and it looks a little rough in there on the frame. The timing seems good. I haven't checked or measured the bolt or cylinder yet, but I've cycled it a bit and it doesn't seem to drag and isn't marking up the finish.

Forgot to mention, my wedge was very tight as well. I tried the clothespin and destroyed about 5 of them, then I used an 1/8th in nail set and a patch of leather. One thing that helped was that a sliver of wood from the clothespin jammed the spring catch down allowing the wedge to back out. Light taps left and right on the wedge drove it out easily.
 

Attachments

  • 1851navy.jpg
    1851navy.jpg
    172.8 KB · Views: 72
Last edited:

smd4

New member
Why do people insist on using a mallet and clothes pins? Why not just go out and spend 5 bucks on a plastic hammer. One good whack and you'll have the wedge out with out having to mess with clothespins! Heck, in a pinch, use the back of a plastic-handled screwdriver.

You've only got two hands--stop messing with clothespins and get the right tool for the job.
 

45 Dragoon

New member
You just need a hard plastic hammer. The problem you have is the rubber mallet. It just needs a good smack to get it out of there!

Of course, now would be a good time to measure the barrel /cylinder clearance and decide what that's going to be. That is adjusted Buy removing metal from the end of the Arbor. You don't want to go less than .0025" (clearance).

Keep in mind that a lighter mainspring will translate to a lighter trigger pull. You can adjust that as well though (thats the last thing to adjust btw). Check the sear engagement (+, neutral, or neg.). Your safest is with positive. It rocks the hammer back before let-off.

Mike
www.goonsgunworks.com
Follow me on Instagram @ goonsgunworks

Hmm, smd4 has it right! Lol
 

foolzrushn

New member
Other alternatives for a punch might be a piece of bronze welding rod, or some nylon dowel stock. Some hardware stores will have various spacers and things made from white nylon. I picked up a cheap set of 8 steel/brass punches at a gun show some time ago.

I suppose that you could just go out and shoot it Jack. Clean it up with water and soap after. You could remove the wood grip if you thought it necessary during cleanup. Then get a punch later.
 

JACKlangrishe

New member
I can explain easily smd.. to a novice, the rubber mallet and clothespin idea seems the least likely to damage the gun, and more appropriate than smacking the side of the gun with the plastic hammer. Obviously, the novice is underestimating just how stuck we're talking about and that the rubber and clothespin are absorbing too much of the impact. Add to this the fact that many popular videos promote the clothespin solution, so its easy to see how this idea can spread.

On my gun.. unless your clothespin is made out of solid brass you're S.O.L.

I'm going with smd and 45 on this one and getting a plastic hammer asap. Tried the plastic handle of the screwdriver and its not budging.

Unfortunately, most are combo units, and all different sizes. I don't want a heavy mallet that makes it more difficult for sharp, precise whacks.

http://www.harborfreight.com/watchmakers-hammer-with-6-heads-99895.html

http://www.harborfreight.com/4-in-1-Quick-Change-Multi-Head-Hammer-69093.html

http://www.harborfreight.com/1-12-lb-soft-face-mallet-69048.html

http://www.homedepot.com/p/URREA-13...ERCH=REC-_-rv_nav_plp_rr-_-NA-_-202797850-_-N

.... Also, the only part of the wedge that's actually sticking out of the other side is a slice of the clip. Most of the wedge is in the gun, and has been so since I've received it. When I whack the side of the gun, that tiny slice of the clip is going to be the only contact point. Part of me thinks that wont be enough, but I also feel any movement at all is going to be enough to break that seal and get it out.
 
Top