Problems with 1851 bolt

Beagle333

New member
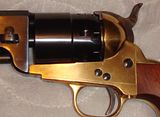
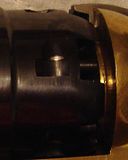
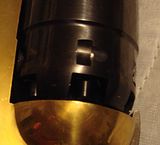
My 1851 Sheriff's bolt is peening the cylinder slot really hard, right where it transitions from the ramp into the slot, and is pushing a little bit of metal out into the slot. How do I stop this before it ruins the slot? It seems like the bolt is slamming into the cylinder right about a half bolt-width before it is supposed to pop into the slot, instead of contacting the cylinder earlier in the turn and sliding down the ramp into the slot. Hopefully, I can figure out how to attach pics to explain this. I have never taken the gun apart before.

th_1851-side.jpg

th_view-2.jpg

th_view-1.jpg


maybe this link will provide a bigger picture...
http://s613.photobucket.com/albums/tt214/shutupandjump/?action=view&current=view-2.jpg
 

denster

New member
You are right that you have a problem. The bolt should drop a bit earlier so that it is in the lead and not half way over the notch. The fix is to remove a small amount from the top of the leg of the bolt that rides on the hammer cam.
 

Beagle333

New member
I figured it had to do with me grinding on something in there. It seems Pietta has welded one of the screws into it, and now that I have twisted the head into a spiral on the bits in my new Wheeler Gunsmith kit (apparently really soft metal), without blemishing or turning the offending screw, I await my new screwdriver bits from Chapman and give those a try. I'll also so some forum searching and order some kind of stone from Brownells too.
 

Doc Hoy

New member
Beagle

The Chapman set is the way to go on a super tight frame screw.

The bits are hollow ground and hard as blazes.

The ratchet handle (which is what I recommend) gives you a) good control and b) outstanding leverage.

The sets have about a million different bits and one of them is perfect for the size screw you are taking out.

Might want to hit it with some PB Blaster or Liquid Wrench.
 

denster

New member
What Doc said about the ratchet handle. Also forget the stone what you will need is a small flat needle file as you will be removing from .002 to .010 of metal. The bolt leg is spring temper so it will file easily.
 

Beagle333

New member
Got the screws loose with the Chapman tips (didn't get the ratchet yet, 'ordered the bits last Wednesday, but I'll get one). Small flat needle file. . . I'll look through the files in the catalog.

(added. . . . Okay, I actually do have the ratchet. It came last summer with the nipple wrench from DGW and I didn't realize it was a Chapman. And yes, it is very handy.)
 
Last edited:

Beagle333

New member
I think I got it figured out. Fortunately, I only have the one problem and not all that other stuff. Now, just to wait on the UPS guy with my new tools.
 

Beagle333

New member
Okay, got it apart and have tools handy. Now, the questions. Here is the bolt as she exists.
http://i613.photobucket.com/albums/tt214/shutupandjump/1860-hybrid/parts1.jpg
Here's a closer view.
http://i613.photobucket.com/albums/tt214/shutupandjump/1860-hybrid/bolt2a.jpg
And I didn't realize it was gonna be this small.
http://i613.photobucket.com/albums/tt214/shutupandjump/1860-hybrid/bolt2ab.jpg
So, the plan is to smooth down (blend in) the bevel on the leg to the right in this pic?
http://i613.photobucket.com/albums/tt214/shutupandjump/1860-hybrid/bolt2ab.jpg
and even closer. . . http://i613.photobucket.com/albums/tt214/shutupandjump/1860-hybrid/bolt2b.jpg
I think smoothing the bevel will be easy. But just how to narrow only the little blackened area of the bolt from will be quite a challenge. Here's where I could use suggestions on technique.
 

Doc Hoy

New member
Beagle

You are very likely going to need a vise.

If you have one, line it with a coupla shims of relatively hard wood. Some folks like leather. Just as good.

Clamp the bolt in the vise but only clamp the part of the bolt that is to the left in your photos. You want to avoid squeezing the legs because, depending upon the material you use to line the vise, you could either sweeze the legs closer together or at worst you could break one of the legs.

You want to get an idea how much has to come off of the bolt before you put it into the vise. Do this by loose fitting the bolt into the cylinder notch as is shown in the Pettifogger article number 2.

Then with one of those fancy files you bought, go to town CAREFULLY on the bolt narrowing it down until it fits in the notches.
 

Beagle333

New member
I have a vise. It was just interesting how i was going to keep the line straight. I know how much to take off, by measuring all slots and the bolt with the caliper. 'Just didn't know if I should file it or stone it. I'll try out the file idea.

I guess for the timing problem, I will do trial and error on smoothing the bevel until the clicks are more evenly spaced. As is, the 2nd and 3rd click when cocking, are a hair's width apart.
 
Last edited:

Beagle333

New member
And the results . . . . The hammer draws back nice and oh-so-smooth now. The bolt fits nicely into the slots. But. . . (the big "but") . . ., the bolt still pops up .040 before full cock, so 2/3 of the bolt is already out over the slot and the trailing 1/3 hits the edge of the slot on the ramp side. That's what was happening before. With repeated cocking, it will peen the metal right back out into the slot again. It should jump up about the width of the bolt head, or around .146 before full cock, slide down the ramp and drop in the slot. So far, I haven't changed the timing any. Hmmmmmmmm. Now, do I need to really thin down that beveled side of the leg, or perhaps stone the cam shorter so it doesn't stick out from the hammer so far.
 

denster

New member
What you do is remove metal from the very top of the bolt leg that rides on the cam. That would be just above where it is beveled. It doesn't take much so go slow.
 

Beagle333

New member
For comparison. . .

So I got out the rusty guts of my old, but still working perfectly, 1860 (I had no idea it was this cruddy in there), but anyway, it has been timed by a gunsmith and pops up correctly. These photos are provided just as a comparison to the new one. New one is on the left, old one is on the right. First noticable is that the cams are different shape.
http://i613.photobucket.com/albums/tt214/shutupandjump/1860-hybrid/hammers2.jpg
http://i613.photobucket.com/albums/tt214/shutupandjump/1860-hybrid/hammers1.jpg
Not that it matters, but the new one is .174 across and the old cam is .194 in width.
Now for the bolts, again, new on top (see where I shaved it), old on bottom
http://i613.photobucket.com/albums/tt214/shutupandjump/1860-hybrid/bolt-comp1.jpg
And the other side. . . and what is interesting here is, the 'smith shaved this side, and not the side recommended in the Pettifogger articles. Doesn't affect timing, just interesting.
http://i613.photobucket.com/albums/tt214/shutupandjump/1860-hybrid/bolt-comp2.jpg
 
Last edited:
Top