
You are using an out of date browser. It may not display this or other websites correctly.
You should upgrade or use an alternative browser.
You should upgrade or use an alternative browser.
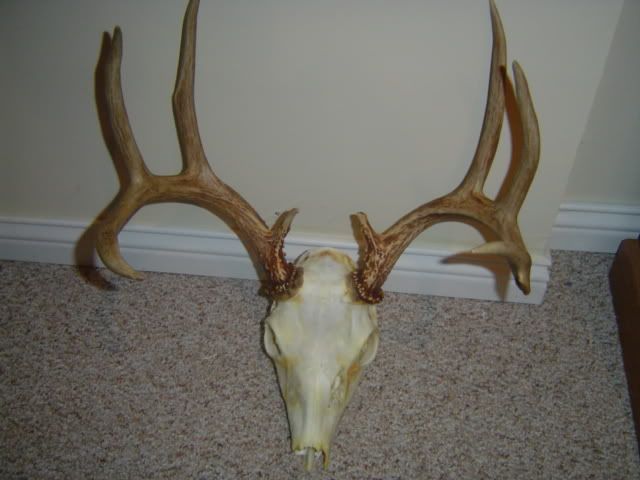
First attempt at a skull mount
- Thread starter Logs
- Start date
FrontSight
New member
Nice, nice...do you have the lower jaw, too?
rantingredneck
New member
Can you post some details of the process or kit used? I'd like to do one of those myself.
Kreyzhorse
New member
Nice job. If you are out of the "kit", hydrogen peroxide mixed with water will bleach the skull white as well.
I did an antelope a few years ago but didn't use a kit. There is a brand of laundry detergent (that I can't remember off the top of my head) that does a great job of removing the oils and stuff when boiling the skull. A solution of peroxide then helps whiten it up.
I did an antelope a few years ago but didn't use a kit. There is a brand of laundry detergent (that I can't remember off the top of my head) that does a great job of removing the oils and stuff when boiling the skull. A solution of peroxide then helps whiten it up.
Didn't use a kit, probably should have though. OOOPS too late now.")
I typically just put the horns on a plaque and do the red velvet thing, but this one I wanted to try the skull mount.
I boiled it for about 5 hours which is WAY to long the bone is pretty soft in areas. I didn't realize how fragile the front bone were and they are gone. After boiling I scraped off most of the flesh.
I then took a mixture of Salt and Borax and let it sit for two weeks.
Next I went to a hair product supply store, yep the only guy in the place. And bought some 40% peroxide $2.00. I recommend not telling them what you are going to use if for. The lady asked me and I said I wanted to bleach out a skull. WOW the look on her face.... I guess I should have said Deer Skull.
I let the Peroxide sit over night TWICE and rinsed with water.
Took a dremel tool to some of the areas trying to get more dried meat off and here we are.
I will try the peroxide for two days to see if I can get it lighter. Still a work in progress by a rookie.
rantingredneck
New member
Looks good to me. I usually just do the horns/skull plate plaque mounts myself, but I'm wanting to try a full skull mount with the next one I kill that is "worthy".
Nice rack too by the way.....
Nice rack too by the way.....
hillbillyshooter
New member
My process
Looks good. If i could give a few suggestions on what a taxidermist instructed me to do.
-Strip as much of the meat off of the skull as possible and remove the brain.
-Place skull in pot of hot water, just below boiling
-Take skull out of water as flesh softens and try to remove more flesh (palate, cartilage in nose, ect.)
-Put skull back in water and repeat these two steps until all of the flesh is off of the skull. (Keeping the water below boiling will prevent a lot of the softening of the bone.
-Used a wire brush to remove gums from the teeth
-Put skull in a pot of 1/3-1/2 bleach to water mixture for 2-3 hours or until desired color is reached. (if you're going to use peroxide instead of bleach you should get the powerful powder from a beauty store that is usually used to bleach hair mix it into a paste and paint it on the skull. I didn't want to mess with this.)
-Take the skull out and let dry for a day or more
-At this point I coated the skull with two coats of spray clear polyurithane (don't do the rack!)
Looks great, its at my other residence so i can't post pictures. I did a button buck like this and it looks like a demon dog, especially after i put decorative red light bulb in the back of its head. Makes a good "conversation piece" for the table, when people ask, "what the hell is that?"
Kreyzhorse, Logs,
You can put some 20 Mule Team Borax in the boiling pot and it will cut your boiling time down to an hour or so. A couple tips. I drill a large hole into the braincase from below. It's kinda tricky, but it helps out in the end to get all the brains and schmang out of the braincase. Boil only for about 20 minutes with the Borax. Then pick as much of the crud off as possible. Start over with new water and Borax and repeat the 20 minute boil/ de-crudding until clean. Usually takes about 3-4 times. I then soak in a 50-50 mixture of peroxide-water for 2-3 days. Skulls will be snow white. Be careful not to immerse any of the horns. They will turn white also. And DO NOT use an aluminum pot. The borax will eat holes through them.
You can put some 20 Mule Team Borax in the boiling pot and it will cut your boiling time down to an hour or so. A couple tips. I drill a large hole into the braincase from below. It's kinda tricky, but it helps out in the end to get all the brains and schmang out of the braincase. Boil only for about 20 minutes with the Borax. Then pick as much of the crud off as possible. Start over with new water and Borax and repeat the 20 minute boil/ de-crudding until clean. Usually takes about 3-4 times. I then soak in a 50-50 mixture of peroxide-water for 2-3 days. Skulls will be snow white. Be careful not to immerse any of the horns. They will turn white also. And DO NOT use an aluminum pot. The borax will eat holes through them.
.41 rem mag fan
New member
my first attempt
A few questions. Is there the need to cover the antlers during this process? If so, how would you do it? With an antelope, would you remove the sheaths and boil the entire skull? Do you just replace the sheaths or would you reattach them to the skull? I am interested in the process of drilling a hole into the braincase. What size hole and what type of drill bit? I have always heard removing the brain is the toughest part of the process.
Christmas is coming and I would like to get my daughter's fisrt buck antelope done for her by then.............
41,
I've done several pronghorns like this. I use just a regular 3/4" drill bit and bore it into the braincase from the bottom. It's kinda hard to explain. For the sheaths, just put the skull in boiling water with the water just a couple inches above the base of the sheaths. They should slip off the skull after only 15-20 minutes of boiling. You'll have to then scrape out all the jelly like gunk inside the sheaths. Fill them with borax and leave them sit upside down for a couple weeks. Then do the whole skull like I explained earlier. After the sheaths have dried, reattach them to the skull protrusions with some caulk or silicone.
I've done several pronghorns like this. I use just a regular 3/4" drill bit and bore it into the braincase from the bottom. It's kinda hard to explain. For the sheaths, just put the skull in boiling water with the water just a couple inches above the base of the sheaths. They should slip off the skull after only 15-20 minutes of boiling. You'll have to then scrape out all the jelly like gunk inside the sheaths. Fill them with borax and leave them sit upside down for a couple weeks. Then do the whole skull like I explained earlier. After the sheaths have dried, reattach them to the skull protrusions with some caulk or silicone.
MeNoLikeTofu
New member
My sister did that last semester for a class project. She had a doe, but also a coyote and a squirrel. They turned out really well. She let hers sit in a bleach solution (I think 75%-ish with water) after boiling and scraping the meat and stuff off. They turned out pretty white. Good job!
my method for doing skull mounts
I have done several dozen skull mounts mostly deer, a couple cow, and my first cyote. here is the method I use, this was typed up for another forum.
European Skull Mount Instruction
1. Purchase a box or two of Arm & Hammer supper washing soda. This product is 100% sodium carbonate (also known a sal-soda) it does not contain fragrance or other additive. A little fragrance would be all right if you ever done a half rotted skull that had been laying around awhile. This is the same stuff that taxidermy supply stores sell for $10 or more for a couple cups. Last time I purchased it was $1.97 per a one pound box. Sodium carbonate is caustic and will cause a chemical burn so wear gloves. What the sodium carbonate does is turn meat, skin, and brains to a jelly like substance that can be easily scrapped off.
2. Find something to boil the skull in; it should be big enough to submerge the skull but not all of the antlers. I made my boil pot out of an old pressure tank from a well. I cut the top off and welded some angle iron for legs. It fits nicely over a propane turkey cooker burner. This is large enough to do a cow skull along with a deer or two. Do not use a pot or container that you would use for anything else that you might eat. Not enough is known about chronic wasting disease and the abnormal protein called a prion that cause this disease to risk using a container that may in the future have contact with food. The boiling process is rather nasty and much of the meat and brain fats and proteins will collect on the sides of the pot. If the skull is not fresh the smell can be rather repulsive. I wanted to experiment with a several skulls before trying this process on a hunting trophy. I knew a location of where the state dot dumped the deer that were killed on the interstate. These skulls where mostly cleaned out by bugs with a few scraps of hard leather like skin left in patches. I lost my cookies a couple times during that boiling and I was outdoors at the time.
3. Prep the skull by stripping off as much skin and meat as possible. The more that is removed the easier the cleaning after boiling will be. Try to remove as much of the brain matter that you can. A piece of wire with a hook on one end attached to an electric drill will help scramble the brain. A long screwdriver will also help remove the brain mater from the cavity. To protect the antlers from the boiling residue wrap in tinfoil. The tinfoil easily forms around all the little bumps around the base of the antlers. Then wrap the tin foiled antlers in plastic wrap. I use the plastic wrap that is on a handle used on loading docks. I have seen this type of wrap at home center stores or the regular kitchen wrap will work also.
4. Add 1 cup of the supper washing soda to five gallons of water. How much water and soda depends on the container. Wrap a piece of wire about a foot long around the rack this makes it easier to remove the skull from the boiling water. You can place the skull in the water right away this will help soften any meat, skin, etc. Boil the skull for ½ to ¾ hour. Remove skull peel and scrape off as much stuff that will come off. I use a toothbrush, plastic scraper, pliers and dental picks. You will probably not get all the stuff off in one try. Boil the skull for another ½ to ¾ hour then repeat scraping. If a lot of gunk remains you can do this step of a third time. Be careful of the nasal cavity there are some very delicate bones in there. After the 2nd boiling I use a hemostat clamp to grab the cartilage and nasal tissue. This piece of tissue should be pulled gently out. Go over entire skull with a hard toothbrush. Any remaining pieces can be scrapped with a dental pick. There are several holes in the back of the skull that will have cartilage in them. These are best scraped and picked out because they will turn yellow in time. The teeth may fall out of the skull while boiling so check the skull for missing teeth, they can be supper glued back in when dry. You do not want to boil the skull for to long because the supper washing soda will eventually start to eat away at the bone. About an hour and a half is about the maximum time you want to do this. After each boiling period I rinse the skull with a hose. I drove by a guy sitting in his front yard boiling a very large racked skull in a pot over a fire. I stopped and he said he had been sitting there for 4 hours and still the meat was not coming off. The base of the antlers was starting to flake in a few places. I ran home and came back with a bag of the supper washing soda. I talked to the guy later and he said the meat had just dropped off after adding the soda and boiling for another ½ hour. He wanted to pay me for the soda and the tip, I refused and told him it was about 60 cents worth of soda and I did not want to see a nice skull like that get ruined.
5. To bleach the skull I place it in a plastic shoe box. I leave the tinfoil and plastic on the antlers. Cover the entire skull with a good quality absorbent paper towels you can tape them around the skull. Soak with peroxide and place about ½ inch on bottom of plastic shoe box. Place plastic shoe box in dark cool location for four or five days. Check daily to keep towels moist with hydrogen peroxide. Remove towel and tinfoil and plastic wrap and hang outside facing the sun out of reach from critters for a week or two. If skull is bleached to you liking you can repeat the plastic shoe box, paper towel, peroxide method. Do not over do it, the peroxide will start to eat away at the bone. The hang time outside may depend on you location also. I have so far used just the drug store variety of hydrogen peroxide but was recommended to me that I should use the stronger solon style hydrogen peroxide. This was explained to me as a method to disinfect or sterilize the skull. I stopped by a solon wholesaler to inquire and the solon grade hydrogen peroxide they had had other ingredients mixed in and never got around to research what it was and how it might affect this process. I have a couple of skulls to do in the next week or two and may try the solon hydrogen peroxide out to see how it works, who knows it might shorten the process.
6. The last step is to spray with a clear lacquer or shellac finish. Use a flat not gloss finish. It is up to you if you want to spray the antlers or not. I have done both ways and will probably re-spray the ones that I did not. Reasons for spraying are: bone will start to deteriorate and dry out and become brittle, this includes the antlers. The spray will help reduce this process and will also act as a fungicidal sealer. I personally do not mount the lower jaw or place the skull on wooden plagues. I usually run some thin wire through the base of the skull and screw to my skull wall.
.41 rem mag fan
New member
NRA,
We live in the Bozangles area. Where were you? Were you hunting?
Anyone have suggestions on boiling pots?
We live in the Bozangles area. Where were you? Were you hunting?
Anyone have suggestions on boiling pots?